Some course homework and projects are completed using CAD tools located on the ECE computers in Kemper 2107. You may use one of those computers by either: 1) sitting at its console in Kemper 2107 or 2) by logging into a computer remotely from outside the 2107 lab. Remote logins are done by either: a) guacamole through a web browser, or b) ssh and X11 over a VPN.
Read the Knowledge Base article Electrical and Computer Engineering RedHat Lab Resource Guide.
Read the ECE Department's Computer Resources page (at http://www.ece.ucdavis.edu/ > Quick Links > Computer Resources) where you can find answers for many computer-related questions.
Perhaps less helpful are the wide variety of help pages at the https://kb.ucdavis.edu/ Knowledge Base.
The guacamole interface is accessed through a web browser using your kerberos login. While very convenient both in terms of using a web browser and not requiring a VPN, the lag time can be somewhat higher.
You may log into 2107 linux machines through the following link from a web
browser:
https://lab-access.engr.ucdavis.edu/
On the web page, select any computer listed under the 2107-Remote-Desktop heading. Do not use 2107-SSH since there is no X11 forwarding on SSH connections in Guacamole so it will be a text-based terminal only.
Once you have logged in using your kerberos login, your browser should appear the same as if you were sitting at a workstating in the 2107 lab.
ssh (secure shell) is a program and protocol that allows secure logins over insecure networks. Using ssh is the best way to log into ECE machines and work with them from remote computers. Type "man ssh" if you want to learn more about ssh.
You will need an ssh client and X11 server to run magic and irsim remotely. These applications come standard on UNIX-based systems such as linux and MacOS. Info for other systems is listed at the bottom of this page.
If needed, start your X Server. Refer to its documentation on how to setup "X11 Forwarding". In Linux the X server is always running.
Log into an ECE machine from your local ssh client.
Due to the large number of hacking attempts coming into campus, you must connect through a UCD VPN to ssh into ECE computers remotely. When you connect your computer to a university VPN, for all practical purposes, your computer will behave exactly the same as if you had dragged an ethernet cable from your location to an ethernet port on campus and plugged it in there.
There are two primary campus VPNs:
Library. This seems to be the best option. Click https://library.ucdavis.edu/vpn/ for the VPN client and installation instructions.
College of engineering. This seems to be for only research and requires special faculty permission as of 2026.
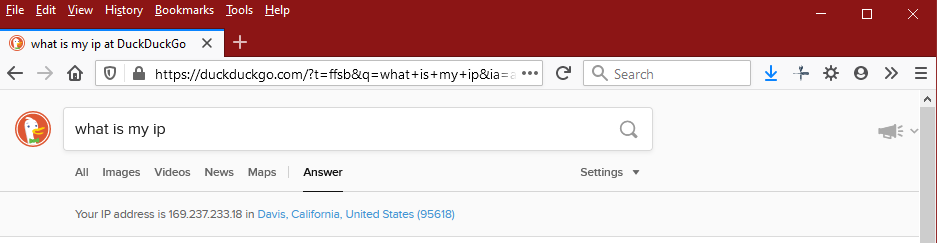
To test whether your VPN connection is working correctly, enter "what is my ip" into your browser both before connecting and after—the address will be different when you connect with the VPN.
Putty is a free, robust, and very easy to setup ssh xterm program for Windows.
Download and install Xming and PuTTY from the links below. Installing Xming will require that you first download the executable file (.exe), then install the program.
PuTTY: http://www.chiark.greenend.org.uk/~sgtatham/putty/download.html
Putty can also be found from:
putty.org > "Download PuTTY here" > www.chiark.greeneend.org.uk
> Binaries > LatestReleaseVers >
For Windows on Intel x86 > PuTTY > putty.exe
After installation, start Xming from the start menu. It is normal that you will not see any changes. Xming is necessary for applications running on the ECE computers to show windows on your local computer (using the X11 protocol).
Run PuTTY by double-clicking the icon you downloaded.
In the "Host Name (or IP address)" field, type "ComputerName.ece.ucdavis.edu". For example, for "python", then this field should be: "python.ece.ucdavis.edu"
"Port" field should already be "22"
"Connection type" should already be "SSH"
In the left column, click the "+" symbol next to "SSH", then click "X11". Check the box next to "Enable X11 forwarding".
In the left column, click "Session" at the very top.
In the "Saved Sessions" field, type a short name to remember the machine name such as "python"
Click "Save" so you can quickly double-click on python to log into that machine with one simple step.
Double-click on python to log into the machine.
Type in your ECE login and password. Verify your display is working using the tests above. Your Putty terminal window will now behave in exactly the same way as if you were logged into the console of the machine in Kemper Hall.
MobaXterm is another option for a ssh terminal program. Read the ECE Support instructions for MobaXterm. I have not used the it however it sounds like it has very nice features.
cygwin is a program for Windows that has a massive number of available packages, and behaves essentially exactly the same as a unix computer. The website http://xahlee.info/mswin/installing_cygwin.html is a helpful starting point.
To download and begin installation, go to https://www.cygwin.com/, click on "Install Cygwin". Then download and run setup-x86_64.exe (64-bit) to begin downloading the necessary packages.
From Windows/Putty: follow the instructions given above.
From Linux, MacOS, or cygwin, type:
ssh user_name@snake.ece.ucdavis.edu -X
or ssh -l user_name snake.ece.ucdavis.edu -X
to log into the machine that should have a light load.
Type "xterm", "xeyes", or "xclock" to verify that your display is working correctly. Type ctrl + c to kill the application.
You can also type "setenv | grep DISPLAY" and verify that a line of the form "DISPLAY=localhost:10.0" is displayed. If neither appear to be correct check your local client settings.
Since the waveform viewer requires the display of its X window, X forwarding must be handled correctly. The key is to enable trusted X11 forwarding.
Common possible options include:
-X for correct X11 operation,
-Y for correct X11 operation, and
-l ECEusername in case your local machine's username
is different from your ECE username.
The ECE Support "Remote Connection Tutorial" page may be helpful.
Normally log into snake.ece.ucdavis.edu
All ECE machines in 2107 Kemper Hall should have the same installation of CAD tools.
adder asp blind boa boom brown cobra copper corn crowned deathadder fierce fox garter gopher hognose indigo king krait mamba milk mud python queen racer rainbow rat rattle redbelly ribbon scarlet swamp timber viper
Add the suffix .ece.ucdavis.edu after each hostname above.
Machines can also be accessed by their cumbersome but formal names: coe-ece-2107-01.ece.ucdavis.edu through coe-ece-2107-35.ece.ucdavis.edu
VNC works in two parts: 1) a VNC Server runs on an ECE linux workstation and must be setup first, 2) a VNC Viewer runs on your local computer and when properly configured and connected, it shows the windows running on the workstation. Your VNC Server session will stay running until you kill it. This is especially beneficial in case your internet connection drops. It also provides a somewhat more responsive environmennt than running X11 applications remotely without VNC.
See the ECE department VNC tutorial. The client to download for windows is of the form vncviewer64-[version].exe which was vncviewer64-1.13.1.exe in Fall 2023.
Some details in our older 116 VNC tutorial may also be helpful.
Log into an ECE machine using ssh and run
setup vnc
This will set up the graphical environment for when you connect with a
VNC Viewer later. If you do not complete this step, you will be greeted
by a blank screen when you log in through VNC.
Next, run vncserver. You can use the manual page (man vncserver) to see how to set the screen size and other useful settings.
Download TigerVNC's VNCViewer.
If on linux you can usually install it from the package manager for
your distribution. If on OSX or Windows you can find the installers
on this page:
http://tigervnc.bphinz.com/nightly/
After VNC Server is running, then you can run magic the same way as you do on the ECE computers.
Your VNC session will stay running until you kill it, and it can
make the server very slow if you start multiple sessions.
Also, for security reasons it is a good idea to end your VNC session
if you will not be using it for some time.
After saving all work and closing all programs on your remote desktop,
ssh back into the machine hosting your VNC session, and type the
following command:
vncserver -kill :
Make sure the message says your session was terminated successfully.
VNC appears to not use the traditional .Xdefault file when opening a new program. So instead you should create an .Xresources file.
Open a new ~/.Xresources file using gedit or your favorite editor.
gedit ~/.Xresources
add these commands to the file:
irsim.traceColor: green
irsim.background: black
open a terminal and type
xrdb -load ~/.Xresources
or better yet, add that line to your
~/.cshrc file so you do not need to type it by hand anymore.
This new setting should give your irsim simulations a black background in the analyzer waveform window. It seems you need to type the xrdb command only once per VNC session.
Please following the following instructions to intall and run RealVNC Server: RealVNC Installation.
After VNC Server is running, then you can run magic the same way as you do on the ECE computers.
Windows
Windows has many free programs available. Popular solutions include:
WinSCP
Mac or linux
Use SFTP almost certainly included in the basic distribution. From a Terminal window, type:
sftp username@ece_machine
cd your_magic_directory
get file_name
2026/09/30 Completely rewrote many sections including adding guacamole 2020/11/12 Added .Xresources files instructions 2020/10/20 Re-wrote putty instructions and put into a shareable file 2020/10/07 Added VPN test using browser 2020/10/05 Correction there are 2 VPNs, not just the CoE one 2020/10/01 Added VPN instructions 2018/06/29 Added MacOS section and some cleanup 2014/10/13 Minor cleanups 2013/10/08 Clean up plus link to VCN tutorial 2009/04/11 Updated to include RealVNC 2008/04/11 Updated to include Xming 2006/06/08 Updated magic/irsim binaries 2006/06/06 Updated magic/irsim technology files 2006/04/12 Updated for Spring 2006