Getting
Started with StarEast Board
Robert Heath and Adam Moerschell
Department of Electrical &
Computer Engineering
University of California, Davis,
CA 95616
Hardware Setup
You will
need at least:
-
2 computers (One must have a serial port, both must have Ethernet ports)
-
2 Ethernet cables
-
1 StarEast board with Intel IXP425 533Mhz Processor
-
1 RS232 Serial-to-Ethernet cable (included with StarEast board)
-
1 StarEast CD (for Linux build)
The
StarEast board has three Ethernet interfaces on it. Two have LEDs on their left hand side. These two ports are for actual traffic
and are called ixp0 and ixp1. Ixp1 is in the middle and ixp0 is on the left hand side. The remaining port is used with the
RS232 cable to configure the board via a terminal connection. This is called the UART port.
Your
setup should connect one computer directly via Ethernet cable to each ixp0 and ixp1. The computer with the serial port should connect to the UART
port via the RS232 cable.
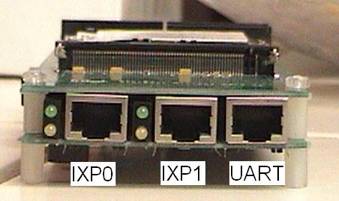
Figure 1 - The Ports of Interest on the
StarEast Board
Connecting to Terminal Interface
You can use any terminal
connection program you want to use to connect to the UART port. Windows users commonly use Hyperterminal, and in linux you can use minicom. The
following connection settings are required:
115200
baud
8
bits
no
parity
1
stop bit
no
hardware control
no
software control
If using minicom make
sure to execute the following command to give access to the serial port:
chmod
666 /dev/ttyS0 (requires permissions)
Once you have set up your
connection, connect then plug the StarEast board in. You should see some boot up messages then the Redboot
prompt:
Redboot>
Building snapgear Images
The “snapgear” directory
on the Stareast cd contains the compressed files that you will need for your
snapgear installation. This
process was done on Fedora Core 3, and should work for all versions of fedora
core and RedHat up to FC3.
1.) Copy the snapgear directory from the CD to the
computer you will be building the images on. If the copied files are read only, modify the permissions to
allow modification of the files and directories.
2.) In the snapgear directory, decompress the snapgear
source code:
tar
vxzf snapgear-3.1.1.tar.gz
This
will create another snapgear directory that contains the source code.
3.) Change to the snapgear directory that was just
created:
cd
snapgear
4.) The IXP400 Access Library integration support
files need to be installed.
tar
vxzf ../snapgear-3.1.x-ixp400-v1.4.2-support.tar.gz
cp
../ixp400AccessLibrary-1_4.zip
vendors/Intel/IXDP425/ixp400-1.4-uclinux/insall
Note:
Destination starts on next line in the command above
vendors/Intel/IXDP425/ixp400-1.4-uclinux/install
5.) The tools for compiling the images need to be
installed. These tools are in the
arm-linux-tools-20030927.tar.gz file.
Decompress this file and it will create a new directory called
“usr”. Move this directory to your
home directory and add it to your path:
export
PATH=/home/<usrname>/usr/local/bin:${PATH}
6.) From the decompressed snapgear directory, the
kernel configuration needs to be run:
make
makeconfig
Make
the following changes in the menu that is displayed:
Vendor/Product Selection --->
---Select the Vendor you wish to target
Intel
Kernel/Library/Defaults Selections --->
---Select the Product you wish to target
IXDP425
Kernel/Library/Defaults Selection --->
(linux-2.4.x) Kernel Version
(glibc) Libc Version
[*]Customize Kernel Settings
[*]Customize Vendor/Usr Settings
After you exit and save, a new window will appear, make the following changes in that window.
General setup --->
[*]Support for hot-pluggable devices
General setup --->
Default kernel command string:
"console=ttyS1,115200 root=/dev/ram0 initrd=0x00800000,16M
mem=64M@0x00000000"
(The commands below are what is changed from the original string in the
string above.)
"ttyS0 -> ttyS1"
"8M -> 16M"
Save
and exit this window, and the last window will appear, make the following
change:
Network device support ---> Wireless LAN (non-hamradio)
[*] Wireless LAN (non-hamradio)
Exit
and save, the menu configuration portion is now complete.
7.) Before building the images, a few files in the snapgear source need to be replaced and modified. From the snapgear directory:
cd
linux-2.4.x/arch/arm/mach-ixp425
vi ixdp425-pci.c
Make
the following changes:
Line 63: “#define IXP425_PCI_MAX_DEV_4”, change
“4” to “5”
Line 70: Add line “{INTD, INTA, INTB, INTC},”
8.) Now change back to the snapgear directory and build the image.
make dep
make
The
images are in /root/stareast/working4/snapgear/images.
NOTE:
If during the “make” process you receive an error about string.h, copy the
string.h file from /usr/include to /usr/include/linux:
cp /usr/include/string.h /usr/include/linux/string.h
This
is necessary for Fedora Core, and possibly later versions of RedHat.
Loading Linux Images
Images:
zImage – Linux kernel.
ramdisk.gz – compressed ramdisk that contains all of
the binaries and other files that are used by linux when it is running.
1.)
Open a terminal
program to communicate with the Stareast board. (setup of the terminal program
is discussed in the Hardware Setup Section).
2.)
Turn on the power to
the Stareast board and wait until the RedBoot prompt appears.
3.)
Load the kernel into
RAM using the following command:
load –r –v –b –m ymodem
–b 0x01600000
a.) Using your terminal program send a file using
Ymodem, and select the zImage file from your images directory.
4.)
Load the ramdisk
into RAM using the following command:
load –r –v –b –m ymodem
–b 0x00800000
a.) Using your terminal program send a file
using Ymodem, and select the
ramdisk.gz file from your images directory.
5.)
After the images are
loaded into RAM they needed to be written to the flash memory so that they do
not have to be uploaded again after a reboot.
a.) At the RedBoot prompt type:
fis
create –b 0x01600000 –l 0xb0000 zImage
This
stores the data at 0x01600000 of size 0xb0000 into the flash memory and is
titled zImage.
b.) At the RedBoot prompt type:
fis
create –b 0x00800000 –l 0x300000 ramdisk
This
stores the data at 0x00800000 of size 0x300000 into the flash memory and is
titled zImage. For the ramdisk
that we have used 0x300000 is an overestimate of the size of the image, but
will not be a problem. If you
notice that after loading an image from flash memory that it has errors when
running, you should check that the size specified when creating the flash file
is large enough, otherwise only part of the image is stored.
Running Linux
Now that you have a
kernel and a ramdisk loaded on the processor, connect via the terminal
program. To load up linux there
are three quick commands:
fis load kernel
fis load ramdisk
go –n 0x01600000
This will now load linux
and you will be left with a prompt that is a hash(#). There is a directory structure and a small amount of
standard linux commands available to you.
If you have added your own executables to the ramdisk (see the Adding a
Custom Program section) you will have access to run them from the prompt here.
Configuring Network Interfaces
The StarEast board has
two network interfaces, ixp0 and ixp1.
To configure these with IP addresses simply use the ifconfig command as
follows:
ifconfig ixp0 10.0.0.1
ifconfig ixp1 192.168.0.1
We ran into some trouble
with the interfaces dropping their configurations. By just typing ifconfig at any time you can see which
interfaces are configured. If
either ixp0 or ixp1 does not show up it has lost its configuration and you will
need to type in one of the above commands again. You should set up the computers connected to these ports to
have IP addresses in the same subnet.
The two ports themselves do not have to be on the same subnet
though. For example
IXP0: 192.168.0.1 <--------> Computer 1: 192.168.0.5
IXP1: 10.0.0.1
<--------> Computer 2: 10.0.0.7
Adding a custom program
In order to add your own
custom program, you will have to modify several files and reconfigure and
rebuild linux as outlined in the Building Linux section.
1) Modify
user/Makefile
Add the following line to the makefile:
dir_$(CONFIG_USER_DIRNAME_PNAME) += dirname
This
will be the name of the directory that will hold your source code to be
compiled. The directory will be
located at user/dirname
2) Modify config/Configure.help
This
will modify the text that is used during the configuration process. Add lines as follows:
CONFIG_USER_DIRNAME_PNAME
This
program does stuff.
Notice
that the second line is indented two spaces.
3) Modify config/config.in
Add
a line in whichever menu section you want your program to show up in. Towards the bottom is the Miscellaneous
section, this can be a safe bet:
bool ‘pname’ CONFIG_USER_DIRNAME_PNAME
You
can have more than one program in a directory, so you can add another line as
follows:
bool ‘otherpname’
CONFIG_USER_DIRNAME_OTHERPNAME
4) Create a program
directory user/dirname, and place your source code in it.
5) Create a Makefile for
your code. Follow this template:
EXEC = pname
OBJS = pname.o
all: $(EXEC)
$(EXEC): $(OBJS)
$(CC) $(LDFLAGS) -o $@
$(OBJS) $(LDLIBS)
romfs:
$(ROMFSINST) /bin/$(EXEC)
clean:
-rm -f $(EXEC) *.elf
*.gdb *.o
If your code has multiple
executables follow this Makefile:
EXECS = pname otherpname
OBJS = pname.o otherpname.o
all: $(EXECS)
$(EXECS): $(OBJS)
$(CC) $(LDFLAGS) -o $@
$@.o $(LDLIBS)
romfs:
$(ROMFSINST) -e
CONFIG_USER_DIRNAME_PNAME /bin/pname
$(ROMFSINST) -e
CONFIG_USER_DIRNAME_OTHERPNAME
/bin/otherpname
6) All that is left to do
is to rerun the configuration.
When doing so look in the menu you added your program to and make sure
to check the checkbox. Next run
make dep and make. This will give
you a proper ramdisk.gz to upload to the IXP425. You will be able to type pname at the prompt to execute the
code. The executable will be
located in /bin .
References
For building Images:
[1] “StarEast Multi-Radio
Wireless Platform Reference Manual.”
Included on the StarEast cd with the processor.
For adding custom
Programs:
[2] D. P. Siddons, “Adding User Applications to the uClinux Distribution.”
For hardware setup and
installing/running linux:
[3] “IXP4XX Open Source Developers Guide” http://ixp4xx-osdg.sourceforge.net/
Questions/Comments
This document was prepared by Robert Heath (rdheath@ucdavis-alumni.com) and Adam Moerschell (atmoerschell@ucdavis.edu) under the
supervision of Prof. Venkatesh Akella as part of the EEC-282 Class on embedded
systems in Spring Quarter 2005.